
Photo by Frames For Your Heart on Unsplash
In the programming world, Builder Pattern is known as one of the popular design patterns in the Creational Pattern group, helping to create complex objects in a flexible and readable way. You may have encountered it in your code but not noticed. In older programming languages, implementing the Builder Pattern could be lengthy and complicated, but newer languages have made it much easier. Today, let’s explore the journey of Builder Pattern from 60 lines of Java code to just 1 line in Kotlin.
What is the Builder Pattern?
In software development, there are many classes that need to be initialized with various properties. For example, a House class might have properties like wall, door, window, roof, garage…
Normally, to initialize an instance of this class, you might write:
| |
Reading this code, you might wonder what 4 and 2 mean. If you use a regular constructor or setters for each property, you may encounter issues like:
- Hard to read and easy to confuse: Calling a constructor with many parameters without knowing their meaning can be confusing.
- Prone to errors: If the order of parameters is wrong, the compiler may not catch it if the parameters have the same type.
- Lack of flexibility: If some properties are optional, you’ll need many overloaded constructors or setters, making the code messy.
- Risk of creating objects in an invalid state: If not all necessary setters are called, the object may lack required data.
That’s why the Builder Pattern was created to solve these problems by moving the code for initializing properties out of the class and into another class called the Builder. You can see the illustration below:
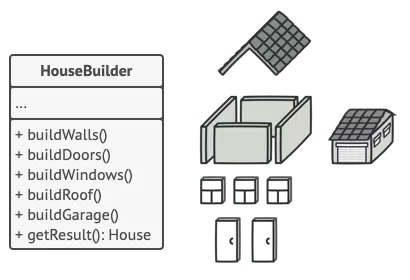
Separating the code into HouseBuilder allows you to create objects step by step, clearly and flexibly. You can choose which properties to set and which to skip.
Let’s look at the implementation in Java next.
Java: Full Builder Pattern
Leaving houses aside, let’s look at another classic example: the User class.
| |
As you can see, it takes 60 lines of code to set up the Builder Design Pattern in Java. For classes with more properties, the boilerplate code increases.
Simplified in Kotlin
With Kotlin and other modern languages (Python, Swift, Dart…), things are simplified thanks to Named Arguments.
Kotlin natively supports named arguments and default values, so you don’t need to implement the Builder Pattern manually:
| |
Tada… No need for a builder class, no need for 60 lines of setters. Just 1 line of code to create an object with flexible parameters. You can declare or skip address, isVerified, and isDeleted as you wish.
Conclusion
From the full Builder Pattern in Java to data class and named arguments in Kotlin, we’ve witnessed a wonderful simplification. That’s why I said Builder Pattern appears in every breath of our code, you just haven’t noticed it yet.
Have a great weekend!